Superset and Jupyter notebooks on AWS as Service

Jupyter Notebook (In EC2 Instance):

The following script is written to run jupyter notebook as a server inside the AWS EC2 instance which you can access from your desktop/laptop if EC2 instance is accessible from your machine:

  • $ conda activate python37
  • $ jupyter notebook –generate-config
    • This will create the jupyter_notebook_config.py configuration file inside your working folder i.e. /home/<username>/.jupyter/
  • $ jupyter notebook password  
    • You can set the password here
  • $ vi /home/centos/.jupyter/jupyter_notebook_config.py
    • Edit the following 2 lines 
    •   c.NotebookApp.ip = ‘0.0.0.0’
    •   c.NotebookApp.port = 8888
  • $ jupyter notebook

Apache Superset (In EC2 Instance):

That’s all.

@avkashchauhan

Installing Apache Superset into CentOS 7 with Python 3.7

Following are the starter commands to install superset:

  • $ python –version
    • Python 3.7.5
  • $ pip install superset

Possible Errors:

You might be hitting any or all of the following error(s):

Running setup.py install for python-geohash … error
ERROR: Command errored out with exit status 1:

building ‘_geohash’ extension
……
unable to execute ‘gcc’: No such file or directory
error: command ‘gcc’ failed with exit status 1

gcc: error trying to exec ‘cc1plus’: execvp: No such file or directory
error: command ‘gcc’ failed with exit status 1

Look for:

  • $ gcc –version <= You must have gcc installed
  • $ locate cc1plus <= You must have cc1plus install

Install the required libraries and tools:

If any of the above components are missing, you need to install a few required libraries:

  • $ sudo yum install mlocate <= For locate command
  • $ sudo updatedb  <= Update for mlocate
  • $ sudo yum install gcc <=For gcc if you don’t have
  • $ sudo yum install gcc-c++  <== For cc1plus if you dont have

Verify the following again:

  • $ gcc –version
  • $ locate cc1plus
    • /usr/libexec/gcc/x86_64-redhat-linux/4.8.2/cc1plus

Note:

  • If you could locate cc1plus properly however still getting the error, try the following
    • sudo ln -s /usr/libexec/gcc/x86_64-redhat-linux/4.8.2/cc1plus /usr/local/bin/
  • Try installing again

Final Installation:

Now you can install  superset as below:

  • $ pip install superset
    • Python 3.7.5
      Flask 1.1.1
      Werkzeug 0.16.0
  • $ superset db upgrade
  • $ export FLASK_APP=superset
  • $ flask fab create-admin
    • Recognized Database Authentications.
      Admin User admin created.
  • $ superset init
  • $ superset run -p 8080 –with-threads –reload –debugger


That’s all.

@avkashchauhan

Steps to connect Apache Superset with Apache Druid

Druid Install:

  • Install Druid and run.
  • Get broker port number from druid configuration, mostly 8082 if not changed.
  • Add a test data source to your druid so you can access that from superset
  • Test
    • $ curl http://localhost:8082/druid/v2/datasources
      • [“testdf”,”plants”]
    • Note: You should get a list of configured druid data sources.
    • Note: If the above command does not work, please fix it first before connecting with superset.

Superset Install:

  • Make sure you have python 3.6 or above
  • Install pydruid to connect from the superset
    • $ pip install pydruid
  • Install Superset and run

Superset Configuration for Druid:

Step 1:

At Superset UI, select “Sources > Drid Clusters” menu option and fill the following info:

  • Verbose Name: <provide a string to identify cluster>
  • Broker Host: Please input IP Address or “LocalHost” or FQDN
  • Broker Port: Please input Broker Port address here (default druid broker port: 8082)
  • Broker Username: If configured input username or leave blank
  • Broker Password: If configured input username or leave blank
  • Broker Endpoint: Add default – druid/v2
  • Cache Timeout: Add as needed or leave empty
  • Cluster: You can use the same verbose name here

The UI looks like as below:

Screen Shot 2019-11-07 at 4.45.28 PM

Save the UI.

Step 2: 

At Superset UI, select “Sources > Drid Datasources” menu option and you will see a list of data sources that you have configured into Druid, as below.


Screen Shot 2019-11-07 at 5.01.56 PM

That’s all you need to get Superset working with Apache Druid.

Common Errors:

[1]

Error:
Error while processing cluster ‘druid’ name ‘requests’ is not defined

Solution:

You might have missed installing pydruid. Please install pydruid or some other python dependency to fix this problem.

[2]

Error while processing cluster ‘druid’ HTTPConnectionPool(host=’druid’, port=8082): Max retries exceeded with url: /druid/v2/datasources (Caused by NewConnectionError(‘<urllib3.connection.HTTPConnection object at 0x10bc69748>: Failed to establish a new connection: [Errno 8] nodename nor servname provided, or not known’))

Solution:

Either your Druid configuration at Superset is wrong or missing some important value. Please follow the configuration steps to provide correct info.


That’s all for now.

@avkashchauhan


Adding MapBox token with SuperSet

To visualize geographic data with superset you will need to get the MapBox token first and then apply that MapBox token with Superset configuration to consume it.

Please visit https://www.mapbox.com/ to request the MapBox token as needed.

Update your shell configuration to support Superset:

What you need:

  • Superset Home
    • If you have installed from pip/pip3 get the site-packages
    • If you have installed from GitHub clone, use the GitHub clone home
  • Superset Config file
    • Create a file name superset_config.py and place it into your $HOME/.superset/ folder
  • Python path includes superset config location with python binary

Update following into your .bash_profile or .zshrc:

export SUPERSET_HOME=/Users/avkashchauhan/anaconda3/lib/python3.7/site-packages/superset
export SUPERSET_CONFIG_PATH=$HOME/.superset/superset_config.py
export PYTHONPATH=/Users/avkashchauhan/anaconda3/bin/python:/Users/avkashchauhan/.superset:$PYTHONPATH

Minimal superset_config.py configuration:

#---------------------------------------------------------
# Superset specific config
#---------------------------------------------------------
ROW_LIMIT = 50000

SQLALCHEMY_DATABASE_URI = 'sqlite:////Users/avkashchauhan/.superset/superset.db'

MAPBOX_API_KEY = 'YOUR_TOKEN_HERE'

Start your superset instance:

$ superset run -p 8080 –with-threads –reload –debugger

Please verify the logs to make sure superset_config.py was loaded and read without any error. The successful logs will look like as below:

Loaded your LOCAL configuration at [/Users/avkashchauhan/.superset/superset_config.py]

If there are errors you will get an error (or more) just after the above line similar to as below:

ERROR:root:Failed to import config for SUPERSET_CONFIG_PATH=/Users/avkashchauhan/.superset/superset_config.py

IF your Sqlite instance is not configured correctly you will get error as below:

2019-11-06 14:25:51,074:ERROR:flask_appbuilder.security.sqla.manager:DB Creation and initialization failed: (sqlite3.OperationalError) unable to open database file
(Background on this error at: http://sqlalche.me/e/e3q8)

The successful superset_config.py loading will return with no error as below:

Loaded your LOCAL configuration at [/Users/avkashchauhan/.superset/superset_config.py]
2019-11-06 17:33:16,588:INFO:root:Configured event logger of type <class 'superset.utils.log.DBEventLogger'>
* Environment: production
WARNING: Do not use the development server in a production environment.
Use a production WSGI server instead.
* Debug mode: off
2019-11-06 17:33:17,294:INFO:werkzeug: * Running on http://127.0.0.1:8080/ (Press CTRL+C to quit)
2019-11-06 17:33:17,306:INFO:werkzeug: * Restarting with fsevents reloader
Loaded your LOCAL configuration at [/Users/avkashchauhan/.superset/superset_config.py]
2019-11-06 17:33:18,644:INFO:root:Configured event logger of type <class 'superset.utils.log.DBEventLogger'>
2019-11-06 17:33:19,345:WARNING:werkzeug: * Debugger is active!
2019-11-06 17:33:19,353:INFO:werkzeug: * Debugger PIN: 134-113-136

Now if you visualize any dataset with geographic columns i.e. longitude and latitude the Superset will be able to show the data properly as below:

Screen Shot 2019-11-06 at 5.49.53 PM

That’s all for now.

@avkashchauhan

Error with python-geohash installation while installing superset in OSX Catalina

Error Installing superset on OSX Catalina:

Command:

$ pip3  install superset

$ pip3 install python-geohash

Error:

Running setup.py install for python-geohash ... error
ERROR: Command errored out with exit status 1:
command: /Users/avkashchauhan/anaconda3/bin/python -u -c 'import sys, setuptools, tokenize; sys.argv[0] = '"'"'/private/var/folders/x7/331tvwcd6p17jj9zdmhnkpyc0000gn/T/pip-install-9hviuey8/python-geohash/setup.py'"'"'; __file__='"'"'/private/var/folders/x7/331tvwcd6p17jj9zdmhnkpyc0000gn/T/pip-install-9hviuey8/python-geohash/setup.py'"'"';f=getattr(tokenize, '"'"'open'"'"', open)(__file__);code=f.read().replace('"'"'\r\n'"'"', '"'"'\n'"'"');f.close();exec(compile(code, __file__, '"'"'exec'"'"'))' install --record /private/var/folders/x7/331tvwcd6p17jj9zdmhnkpyc0000gn/T/pip-record-h0in5a0u/install-record.txt --single-version-externally-managed --compile
cwd: /private/var/folders/x7/331tvwcd6p17jj9zdmhnkpyc0000gn/T/pip-install-9hviuey8/python-geohash/
Complete output (21 lines):
running install
running build
running build_py
creating build
creating build/lib.macosx-10.7-x86_64-3.7
copying geohash.py -> build/lib.macosx-10.7-x86_64-3.7
copying quadtree.py -> build/lib.macosx-10.7-x86_64-3.7
copying jpgrid.py -> build/lib.macosx-10.7-x86_64-3.7
copying jpiarea.py -> build/lib.macosx-10.7-x86_64-3.7
running build_ext
building '_geohash' extension
creating build/temp.macosx-10.7-x86_64-3.7
creating build/temp.macosx-10.7-x86_64-3.7/src
gcc -Wno-unused-result -Wsign-compare -Wunreachable-code -DNDEBUG -g -fwrapv -O3 -Wall -Wstrict-prototypes -I/Users/avkashchauhan/anaconda3/include -arch x86_64 -I/Users/avkashchauhan/anaconda3/include -arch x86_64 -DPYTHON_MODULE=1 -I/Users/avkashchauhan/anaconda3/include/python3.7m -c src/geohash.cpp -o build/temp.macosx-10.7-x86_64-3.7/src/geohash.o
warning: include path for stdlibc++ headers not found; pass '-stdlib=libc++' on the command line to use the libc++ standard library instead [-Wstdlibcxx-not-found]
1 warning generated.
g++ -bundle -undefined dynamic_lookup -L/Users/avkashchauhan/anaconda3/lib -arch x86_64 -L/Users/avkashchauhan/anaconda3/lib -arch x86_64 -arch x86_64 build/temp.macosx-10.7-x86_64-3.7/src/geohash.o -o build/lib.macosx-10.7-x86_64-3.7/_geohash.cpython-37m-darwin.so
clang: warning: libstdc++ is deprecated; move to libc++ with a minimum deployment target of OS X 10.9 [-Wdeprecated]
ld: library not found for -lstdc++
clang: error: linker command failed with exit code 1 (use -v to see invocation)
error: command 'g++' failed with exit status 1
----------------------------------------
ERROR: Command errored out with exit status 1: /Users/avkashchauhan/anaconda3/bin/python -u -c 'import sys, setuptools, tokenize; sys.argv[0] = '"'"'/private/var/folders/x7/331tvwcd6p17jj9zdmhnkpyc0000gn/T/pip-install-9hviuey8/python-geohash/setup.py'"'"'; __file__='"'"'/private/var/folders/x7/331tvwcd6p17jj9zdmhnkpyc0000gn/T/pip-install-9hviuey8/python-geohash/setup.py'"'"';f=getattr(tokenize, '"'"'open'"'"', open)(__file__);code=f.read().replace('"'"'\r\n'"'"', '"'"'\n'"'"');f.close();exec(compile(code, __file__, '"'"'exec'"'"'))' install --record /private/var/folders/x7/331tvwcd6p17jj9zdmhnkpyc0000gn/T/pip-record-h0in5a0u/install-record.txt --single-version-externally-managed --compile Check the logs for full command output.

Reason:

clang: warning: libstdc++ is deprecated; move to libc++ with a minimum deployment target of OS X 10.9 [-Wdeprecated]
ld: library not found for -lstdc++
clang: error: linker command failed with exit code 1 (use -v to see invocation)
error: command 'g++' failed with exit status 1

Solution:

$ sudo CFLAGS=-stdlib=libc++ pip3 install python-geohash

$ sudo CFLAGS=-stdlib=libc++ pip3 install superser

That’s all for now.

@avkashchauhan

Installing R packages missing R_X11.so error


install.packages(“roxygen2”)

— Please select a CRAN mirror for use in this session —
Secure CRAN mirrors

1: 0-Cloud [https] 2: Algeria [https]
3: Australia (Canberra) [https] 4: Australia (Melbourne 1) [https]
5: Australia (Melbourne 2) [https] 6: Australia (Perth) [https]
7: Austria [https] 8: Belgium (Ghent) [https]
9: Brazil (PR) [https] 10: Brazil (RJ) [https]
11: Brazil (SP 1) [https] 12: Brazil (SP 2) [https]
13: Bulgaria [https] 14: Chile 1 [https]
15: Chile 2 [https] 16: China (Hong Kong) [https]
17: China (Guangzhou) [https] 18: China (Lanzhou) [https]
19: China (Shanghai 1) [https] 20: China (Shanghai 2) [https]
21: Colombia (Cali) [https] 22: Czech Republic [https]
23: Denmark [https] 24: East Asia [https]
25: Ecuador (Cuenca) [https] 26: Ecuador (Quito) [https]
27: Estonia [https] 28: France (Lyon 1) [https]
29: France (Lyon 2) [https] 30: France (Marseille) [https]
31: France (Montpellier) [https] 32: France (Paris 2) [https]
33: Germany (Erlangen) [https] 34: Germany (Göttingen) [https]
35: Germany (Münster) [https] 36: Greece [https]
37: Iceland [https] 38: India [https]
39: Indonesia (Jakarta) [https] 40: Ireland [https]
41: Italy (Padua) [https] 42: Japan (Tokyo) [https]
43: Japan (Yonezawa) [https] 44: Korea (Busan) [https]
45: Korea (Seoul 1) [https] 46: Korea (Ulsan) [https]
47: Malaysia [https] 48: Mexico (Mexico City) [https]
49: Norway [https] 50: Philippines [https]
51: Serbia [https] 52: Spain (A Coruña) [https]
53: Spain (Madrid) [https] 54: Sweden [https]
55: Switzerland [https] 56: Turkey (Denizli) [https]
57: Turkey (Mersin) [https] 58: UK (Bristol) [https]
59: UK (London 1) [https] 60: USA (CA 1) [https]
61: USA (IA) [https] 62: USA (KS) [https]
63: USA (MI 1) [https] 64: USA (NY) [https]
65: USA (OR) [https] 66: USA (TN) [https]
67: USA (TX 1) [https] 68: Uruguay [https]
69: Vietnam [https] 70: (other mirrors)
Selection: 60
trying URL ‘https://cran.cnr.berkeley.edu/bin/macosx/el-capitan/contrib/3.5/roxygen2_6.1.0.tgz&#8217;

Content type ‘application/x-gzip’ length 712037 bytes (695 KB)

downloaded 695 KB
The downloaded binary packages are in
/var/folders/tt/vy5b7m5s7rb54r02c9r647tc0000gn/T//RtmpSKQcBX/downloaded_packages
Warning message:
In doTryCatch(return(expr), name, parentenv, handler) :
unable to load shared object ‘/Library/Frameworks/R.framework/Resources/modules//R_X11.so’:
dlopen(/Library/Frameworks/R.framework/Resources/modules//R_X11.so, 6): Library not loaded: /opt/X11/lib/libSM.6.dylib
Referenced from: /Library/Frameworks/R.framework/Resources/modules//R_X11.so
Reason: image not found

quit()


SOlution > Just Install XQuartz from the link below and you dont need to set X11 as default server at all. It should fix your problem.

https://www.xquartz.org/

Conda Python 3.5 and OpenCV 3 with Matplotlib and QT5 backend

As title suggests lets get to work:

Create the Conda Environment with Python 3.5

$ conda create -n python35 python=35
$ conda activate python35

Inside the conda environment we need to install pyqt5, pyside, pyobj-core, pyobjc-framework-cocoa packages:

Installing QT5 required packages inside Conda:

$ conda install -c dsdale24 pyqt5
$ conda install -c conda-forge pyside
## Note: I couldn;t find these with conda on conda-forge so used pip
$ pip install pyobjc-core
$ pip install pyobjc-framework-cocoa

Verifying Python 3.5:

$ python

Python 3.5.4 |Anaconda, Inc.| (default, Feb 19 2018, 11:51:41)
[GCC 4.2.1 Compatible Clang 4.0.1 (tags/RELEASE_401/final)] on darwin
Type "help", "copyright", "credits" or "license" for more information.
>>>

Checking backend used by matplotlib:

import matplotlib
matplotlib.get_backend()

If you see ‘MacOSX‘ means it is using MacOSX backend and we need to change it to qt as below:

Changing matplotlib backend to use QT5:

matplotlib.use('qt5agg')
matplotlib.get_backend()

This will result as qt5agg backend to be used with CV2.

Sample code to show image using OpenCV3

Trying a sample OpenCV3 code to show image:

import cv2
image = cv2.imread("/work/src/github/aiprojects/avkash_cv/matrix.png")
import matplotlib.pyplot as plt
plt.figure()
plt.imshow(image)
plt.show()

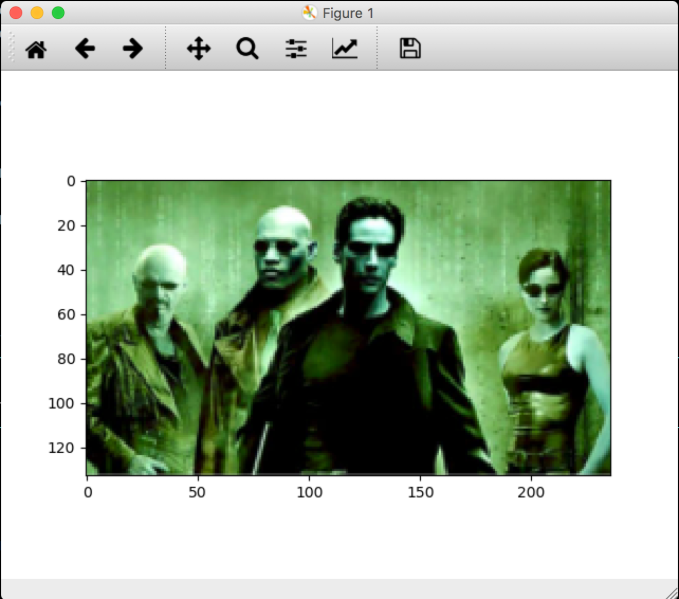
This is how image rendered with QT5 backend:

matrix

That’s it, enjoy!!

@avkashchauhan


Compile OpenCV3 with Python3.5 Conda environment on OSX Sierra

As title suggests, lets get is going…

Create the Conda Environment with Python 3.5

$ conda create -n python35 python=35
$ conda activate python35

Verify the Conda Environment with python 3.5

$ python 
Python 2.7.14 |Anaconda custom (64-bit)| (default, Dec 7 2017, 11:07:58)

Now we will install tensorflow latest which will install lots of required dependency I really needed:

$ conda install -c conda-forge tensorflow

Python run time environment and Folder

Now we will look to confirm the python path

$ which python
/Users/avkashchauhan/anaconda3/bin/python

Now we need to find out where the Python.h header file is which will be used as the values for PYTHON3_INCLUDE_DIR later:

$ ll /Users/avkashchauhan/anaconda3/envs/python35/include/python3.5m/Python.h

Now we need to find out where the libpython3.5m.dylib library file is which will be used as the values forPYTHON3_LIBRARY later:

$ ll /Users/avkashchauhan/anaconda3/envs/python35/lib/libpython3.5m.dylib

Lets clone the OpenCV master repo and opencv_contrib at the same base folder and as below:

$ git clone https://github.com/opencv/opencv
$ git clone https://github.com/opencv/opencv_contrib

Lets create the build environment:

$ cd opencv
$ mkdir build
$ cd build

Now Lets configure the build environment first:

$ cmake -D CMAKE_BUILD_TYPE=RELEASE \
 -D CMAKE_INSTALL_PREFIX=/usr/local \
 -D OPENCV_EXTRA_MODULES_PATH=../../opencv_contrib/modules \
 -D PYTHON3_LIBRARY=/Users/avkashchauhan/anaconda3/envs/python35/lib/libpython3.5m.dylib \
 -D PYTHON3_INCLUDE_DIR=/Users/avkashchauhan/anaconda3/envs/python35/include/python3.5m/ \
 -D PYTHON3_EXECUTABLE=/Users/avkashchauhan/anaconda3/envs/python35/bin/python \
 -D BUILD_opencv_python2=OFF \
 -D BUILD_opencv_python3=ON \
 -D INSTALL_PYTHON_EXAMPLES=ON \
 -D INSTALL_C_EXAMPLES=OFF \
 -D BUILD_EXAMPLES=ON ..

The configuration shows following key settings:

......
......
-- Found PythonInterp: /Users/avkashchauhan/anaconda3/bin/python2.7 (found suitable version "2.7.14", minimum required is "2.7")
-- Could NOT find PythonLibs: Found unsuitable version "2.7.10", but required is exact version "2.7.14" (found /usr/lib/libpython2.7.dylib)
-- Found PythonInterp: /Users/avkashchauhan/anaconda3/envs/python35/bin/python (found suitable version "3.5.4", minimum required is "3.4")
-- Found PythonLibs: YYY (Required is exact version "3.5.4")
....
-- Python 3:
-- Interpreter: /Users/avkashchauhan/anaconda3/envs/python35/bin/python (ver 3.5.4)
-- Libraries: YYY
-- numpy: /Users/avkashchauhan/anaconda3/envs/python35/lib/python3.5/site-packages/numpy/core/include (ver 1.12.1)
-- packages path: lib/python3.5/site-packages
--
-- Python (for build): /Users/avkashchauhan/anaconda3/bin/python2.7
-- Pylint: /Users/avkashchauhan/anaconda3/bin/pylint (ver: 1.8.2, checks: 116)
--
General configuration for OpenCV 3.4.1-dev =====================================
-- Version control: 3.4.1-26-g667f5b655

Building the OpenCV code:

Now lets build the code:

$ make -j4

The successful build output end with the following console log:

Scanning dependencies of target example_face_facemark_demo_aam
[ 99%] Building CXX object modules/face/CMakeFiles/example_face_facemark_demo_aam.dir/samples/facemark_demo_aam.cpp.o
[ 99%] Linking CXX executable ../../bin/example_face_facemark_lbf_fitting
[ 99%] Built target example_face_facemark_lbf_fitting
[ 99%] Building CXX object modules/face/CMakeFiles/opencv_test_face.dir/test/test_facemark_lbf.cpp.o
[ 99%] Linking CXX executable ../../bin/example_face_facerec_save_load
[ 99%] Built target example_face_facerec_save_load
[ 99%] Building CXX object modules/face/CMakeFiles/opencv_test_face.dir/test/test_loadsave.cpp.o
[100%] Building CXX object modules/face/CMakeFiles/opencv_test_face.dir/test/test_main.cpp.o
[100%] Linking CXX executable ../../bin/example_face_facemark_demo_aam
[100%] Built target example_face_facemark_demo_aam
[100%] Linking CXX executable ../../bin/opencv_test_face
[100%] Built target opencv_test_face

Lets install is locally:

To install the final library try the following:

$ sudo make install

Once install is completed you will confirm the build output as below:

$ ll /usr/local/lib/python3.5/site-packages/cv2.cpython-35m-darwin.so

Copying final openCV library to Python 3.5 site package:

As we know that Python 3.5 Conda environment folder site-packages is here:

/Users/avkashchauhan/anaconda3/envs/python35/lib/python3.5/site-packages

So we will copy to final cv2.cpython-35m-darwin.so to Python 3.5 Conda environment folder site-packages as cv2.so as below:

$ cp /usr/local/lib/python3.5/site-packages/cv2.cpython-35m-darwin.so 
     /Users/avkashchauhan/anaconda3/envs/python35/lib/python3.5/site-packages/cv2.so

Confirm it:

$ ll /Users/avkashchauhan/anaconda3/envs/python35/lib/python3.5/site-packages/cv2.so

Verification OpenCV with Python 3.5:

Now Verify the OpenCV with Python 3.5 on Conda Environment:

$ python 
Python 3.5.4 |Anaconda, Inc.| (default, Feb 19 2018, 11:51:41)
[GCC 4.2.1 Compatible Clang 4.0.1 (tags/RELEASE_401/final)] on darwin
Type "help", "copyright", "credits" or "license" for more information.
>>> import cv2
>>> cv2.__version__
'3.4.1-dev'
>>>

Now lets run OpenCV with as example:

import numpy as np
import cv2

# Load an color image in grayscale
img = cv2.imread('/work/src/github/aiprojects/avkash_cv/test_image.png', 0)
while(True): 
    cv2.startWindowThread() 
    cv2.namedWindow("preview")
    # Display the resulting frame 
    cv2.imshow("preview", img) 
    if cv2.waitKey(1) & 0xFF == ord('q'): 
        break
# When everything done, release the capture
cv2.destroyAllWindows()

Thats it, enjoy!!

@avkashchauhan

Machine Learning adoption for any organization

At this point there is no doubt that any organization can take the advantage of machine learning by applying machine learning into their business process. The significance of machine learning application will depend on how it is applied and what kind of problem you as an organization trying to solve with machine learning. The results are also depend on the experience of your data scientists and software engineer along with the adoption of technology.

In this article we will learn how machine learning development life cycle really looks like and how any organization can build a team to solve their business problem with machine learning. Lets get us started with the following image in mind:

Screen Shot 2018-02-18 at 1.15.52 PM

As you can see above the machine learning process is a continuous process of extracting data from variety of sources then feeding into machine learning engines which generates the model. These models are plugged into business process to produce the results. The results from the models are feed into the process to solve business problems.  These models can produce results independently as well at the edge depending on their usage.

At this point the critical question is to understand what a machine learning development life cycle really look like. What kind of talent is really required to pull it off? What these teams really do while building and applying machine learning?

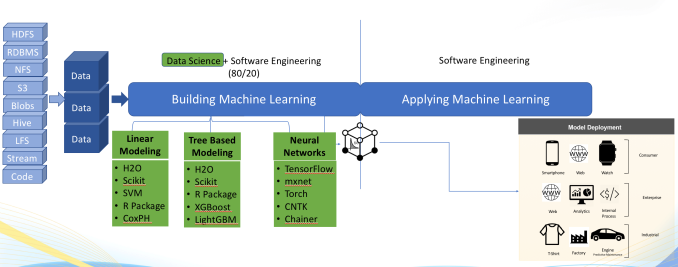
We will get the answers to above questions as we progress further. If we look at machine learning development life cycle image below we will see the following paradigms:

  1. Collecting data from various resources
  2. After data collecting, making it machine learning ready
  3. The machine learning ready data is feed into “building machine learning” process where a data science heavy team is working on data to produce results.

Screen Shot 2018-02-18 at 1.16.01 PM

Above you can see the the building machine learning process is very data science heavy work however applying machine is mainly the software engineering process. You can use the above understanding to figure out the technical resources needed to implement end to end machine learning pipeline for your organization.

The next question comes in our mind is the separation of building machine learning and applying machine learning. how these two process are difference? What is the end results of machine learning process and how software engineering can apply its out?

Looking at the image below we can see the product of “building machine learning” process is the final or leader model which an enterprise or business and use as the final product. This model is ready to produce results as needed.

Screen Shot 2018-02-18 at 1.16.12 PM

The model can be applied to various consumer, enterprise and industrial use cases to provide edge level intelligence, or in process intelligence where model results are fed into another process. Sometimes the model is fed into another machine learning process to generate further results.

Once we have understood the significance of key individuals in end to end machine learning process, the question in our mind if what the key individual do in day to day process? How to they really engage into the process of building machine learning? What kind of tools and technology they adopt or create to solve organization business problem?

To understand the kind of work data scientists will be doing while building machine learning, we can see their main focus to use and apply as many as machine learning engines along with various algorithms to solve the specific problem. Sometime they create something brand new to solve the problem they have in their hand as there is nothing available, or sometimes they just need to improve an available solution.

Screen Shot 2018-02-18 at 1.16.21 PM
The above image puts together the conceptual idea of various engines, could be used by the team of data scientists in any organization to accomplish their task.

The role of software engineering is critical in overall machine learning pipeline. They help data science process to speed up and refine the process to generate faster results while applying the software engineering methods top of data science.

The image below explains how software engineers can expedite the work of data scientists by create fully automated machine learning system which perform the repetitive tasks of data scientists in full automated fashion. At this point data scientists are open to use their time to solve newer problems and just keep an eye of the automated system to make sure it is working as their expectation.

Screen Shot 2018-02-18 at 1.16.31 PM


Various organization i.e. Google (i.e. CloudML), H2O (i.e. AutoML) has created automated machine learning software which can be utilized by any organization. There are open sources packages also available i.e. Auto-SKLearn, TPOT.

Any organization can follow the above details to adopt machine learning into their organization and generate expected results.

Helpful Articles:

Thank you, all the very best!

Enjoy!!

@avkashchauhan